Cheat Sheet for Lighting your Fire
The first use of your stove after installation is super exciting but we know it can also be a bit daunting! If you’re new to using a woodburner it can be difficult to know how to get a consistent healthy fire going, especially on the first few attempts. Our boys do give a little demo and some advice to get you started, but we are going to give you a ‘cheat sheet’ of sorts to really get you clued up on how to master lighting your stove, old or new.
1. 'Top Down' Method
The very first place to start is the basic method of tackling how you light your fire. For us, a ‘fool-proof’ method is the top-down method, which is very popular in Europe. One of the reasons this method is so successful and easy is because it aids the flue get up to temperature quicker and removes the need to open the appliance door to add fuel to the kindling - so doesn’t give the firebox the opportunity to cool. The flue will be warm once the well-ignited kindling has burned through, and the logs on which the kindling has sat should now be scorched and ignite cleanly.
When you google this method however, a number of videos and articles pop up depicting a great architecture which you must construct inside your firebox in order to succeed, although this definitely still works, we find that the majority of the steps they take you through are unnecessary and time-consuming. For us, all you need is two medium size logs which fit inside your firebox with a small gap between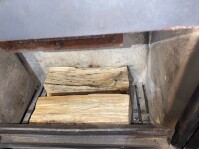
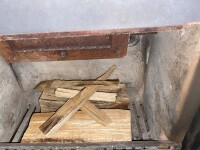
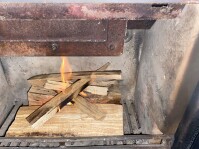
them, and a couple of bits of kindling (which you can very easily and conveniently chop up with a kindling cracker) placed in a criss-cross shape bridging the gap. Then you pop a lit firelighter into the gap underneath the kindling and with your air vents open the fire will ignite, you can go make a cup of tea and put your feet up as a steady flame grows. Then when you next need to refuel you can reduce the air flow to maintain a substantial burn.
2. Fuel Moisture
Another really crucial aspect of lighting your stove, which greatly impacts the success, is the moisture of the fuel you are using. It is highly recommended that you must only burn fuel that has a moisture content of less than 20%. There are pretty much two ways of achieving this: leaving freshly felled wood which has a moisture content of between 60% and 80% to dry in a covered but airy store for between 12 and 36 months before being used or buying kiln dried wood. To ensure that the fuel you’re buying is dried to a moisture content of less than 20%, look out for the Woodsure Ready To Burn logo.
For the economically inclined, using dry wood also means that fewer logs are needed to produce the same level of heat, this saves money and protects your liner which is often the most expensive part of an installation. When you burn wood with a high moisture content you are essentially boiling water which means you are sending water vapour up your flue. When burning damp wood your firebox can’t heat up enough to produce gases which are hot enough to exit the chimney swiftly. So the gases and water vapour linger in your liner and when the inevitable condensation mixes with the tar and creosote in your gases, sulphuric acid is made which then corrodes your stainless-steel liner and greatly reduces the life expectancy of the liner. In short, dry wood = better fire.
3. Cold Plugs
Multi fuel stove users sometimes come up against 'Cold Air Plugs', this can be a bit surprising and definitely alarming. It's common for insulated twin wall flues or exposed chimneys to experience a ‘cold plug’ and it occurs when temperatures drop suddenly and an invisible plug of cold air forms in the chimney. The result is that the chimney is effectively plugged and pushes smoke back down and out of the log burner into the room, it can occur even overnight if temperatures drop rapidly. It can also occur where a chimney has not been used for a while (but is known to be clean i.e. not blocked with a birds nest).
A solution to avoid this is to try leaving the door of the stove open for about half an hour prior to lighting and/or start by lighting a firelighter on its own, opening the air vents and closing the door, then when the firelighter is almost burnt add another and some kindling. Allow this to burn for about five minutes before adding the logs. The idea is to gently increase the internal temperature of your chimney which will dissipate the cold air plug.
Now you're a certified black belt in lighting your stove, take your new knowledge and run with it!!